
Finally, Andot has come out a customized version of WM6 ROM for HTC Tornado Device. Yes! My Dopod 577W is HTC Tornado Device. I grabbed a copy but holyshit! I do not know how to flush it into my Dopod 577W because it is not an executable format… A big tragedy to me because I have to spend another few hours to Google about how to flush the ROM.
I must tell you that this world is very fair! There is no free-lunch in this world. I spend almost 3 hours in Google and type not less than 100 search keywords but I get nothing! Finally, I give up on search for a total reference but to learn how to flush my Dopod 577W on how to use the utilities! After an hour, I succeeded. It took me a lot of courage and very high risk to do that. It seems the Lucky Goddess is always smiling at me, so I get it done in 1 round. LoL. I am damn proud of myself!
Now I am going to teach you How To Flush Microsoft Windows Mobile 6 into DOPOD 577W or HTC Tornado Device. Please allow me to make a few declarations here.
1. All the tools that I am using in this guide comes with no warranty or guarantee, use it at your own risk.
2. The Windows Mobiles ROM that I used is an unofficial release from this PRO! So… use it at your own risk!
3. Please don’t come to me if you fail.
4. Read the whole article before you take any action! Ensure you understand and know how to do it right!
Download the tools and ROM below if you want to flush your device based on my guide.
1. Tools (Download it and extract into a folder, you will need to use it soon!)
2. Andot’s Windows Mobile 6 for Tornado Perfect English Edition Released!
There are 11 steps involved
Step 1 – Preparation
Step 2 – Application Unlock
Step 3 – SuperCID – install cert.cab on phone
Step 4 – SuperCID – Patching the ROM
Step 5 – Disable USB Connection
Step 6 – Access the Bootloader
Step 7 – Format BINFS via TeraTermPro
Step 8 – Enable USB Connection
Step 9 – Running the GSM update
Step 10 – Running the OS update
Step 11 – Installing input method (optional)
Step 1 – Preparation
Please get all the tools and ROM ready. Kindly install Mircosoft Active Sync 4.5 or above. Connect your device via USB.
** Make sure you are using a HTC Tornado device, it is also known as Dopod 577W, Qtek 8300, Qtek 8310, Imate SP5, I-mate SP5m and Orange SPV C600. Ensure that your battery is charged up to at least 50%.
Step 2 – Application Unlock
Now, look into the folder with you extracted the Tools. Open the SDA_ApplicationUnlock.exe and click Remove Lock button. The purpose this is to ensure that you can install any unsigned 3rd party application (which is the tool needed to SuperCID in the next step) . If your device is already application unlock, you can skip this step. But it is no harm to do it again…

Step 3 – SuperCID – install cert.cab on phone
If your device is patched with SuperCID, you can skip this step and proceed to Step 4, if you have no idea what is SuperCID, you can do it again. First, locate the SPV Services inside the tools folder. This is the software to do SuperCID. Extract it to a folder, let’s say on a desktop. You will see three files in it. Cert.cab , TyphoonNBFTools.dll and SPV-services.exe. Copy cert.cab to any location on your smartphone and install it.

Step 4 – SuperCID – Patching the ROM
Now run SPVServices.exe which is located same folder with the Cert.cab, you should see this. RAPI Init was successful means that your ROM is ready to be patched with 16 bytes of data in order to allow it to be flushed with any ROM, by clicking on Set CID, your warranty is void. Stop here if you don’t want to lose your warranty.

Step 5 – Disable USB Connection
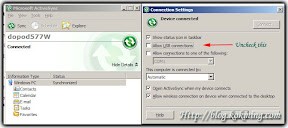
Turn off your phone, detach the USB cable, and disable Microsoft Active Sync USB connection.
Open Microsoft Active Sync, click File -> Connection Settings -> Uncheck the allow USB connection
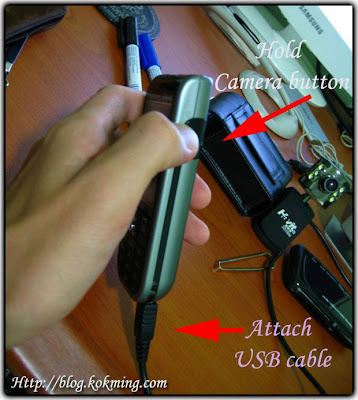
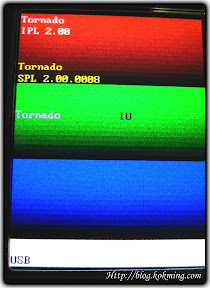
Step 6 – Access to the bootloader. During the phone is turned off, hold the camera button and attach the USB cable. Wait until a 3 colour screen appears, that is your bootloader screen.
Step 7 – Format BINFS via TeraTermPro
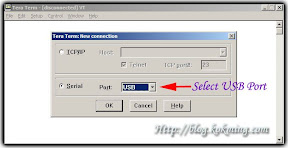
Now, please run the TeraTermPro inside the tools folder. Please select the USB port as connection type.
Type ‘info 2’ without the quotes. Then, hit Enter, this is what you will see a screen like this. Notice the HTCSuperCID on the output display. 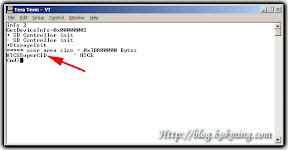
Now, you are all set to go!
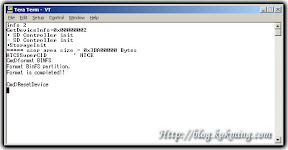
Type ‘format BINFS’ without the quotes. It is case sensitive, you must key-in the alphabet accordingly. Please type format BINFS and not format only because with Format only will erase your IPL and SPL which is your bootloader … (if you did that… you are in deep shit!)
The HTCSuperCID means your device is SuperCID and it can be flushed with any ROM, even though its not meant or could destroy your device. If you do not see HTCSuperCID, it means that you did not SuperCID properly, repeat Step 4. Once it is done, type ‘ResetDevice’
Step 8 – Enable USB Connection
Now you are ready to flash your device. Please enable Microsoft ActiveSync USB connection, refer to Step 5.
Step 9 – Running the GSM update
Now locate the WM6GSMUpdate inside the Tools folder. Please run RomUpgradeUtility, you should see this screen.

Click “I understand . . .” and then click Next, then click “I completed the steps. . .”. Hit Next and it will verify your information.
After that click Update and watch as the meter moves on your device and your screen.
Do not attempt do anything silly now because your IPL, SPL and Radio are being patched now. Anything unexpected(for example power loss, USB cable detached, and etc) which happen could render your device useless. This process will be fast enough, around 2 minutes. Once it is done, it will reboot by itself and you will be returned to the bootloader screen.
Step 10 – Running the OS update
While you are in the bootloader screen, extract Andot’s V6 Perfect English Edition Windows Mobile 6 for HTC Tornado and the rest is pretty similar to the Step 9. Run ROMUpgradeUtility which in inside the Windows Mobile 6.0 ROM folder, you will see the same RUU screen, do the same thing and upgrade. But this time ,you are installing Windows Mobile 6. This process takes time, around 10 minutes will pause for some times at 99%, just be patient. Once you are done, your device will reboot once again but this time, your device will be loading Windows Mobile 6!
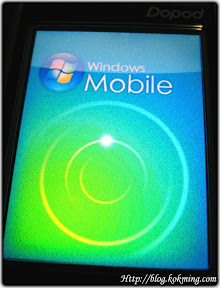

Welcome to the new world of Microsoft Windows Mobile 6!!!
Step 11 – Installing input method (optional)
The Windows Mobile 6.0 that you just installed do not have the T9 English input method. You can find it under the Tools folder and install it by yourself.
Leave your message if you have any question.
Happy Upgrading~!

